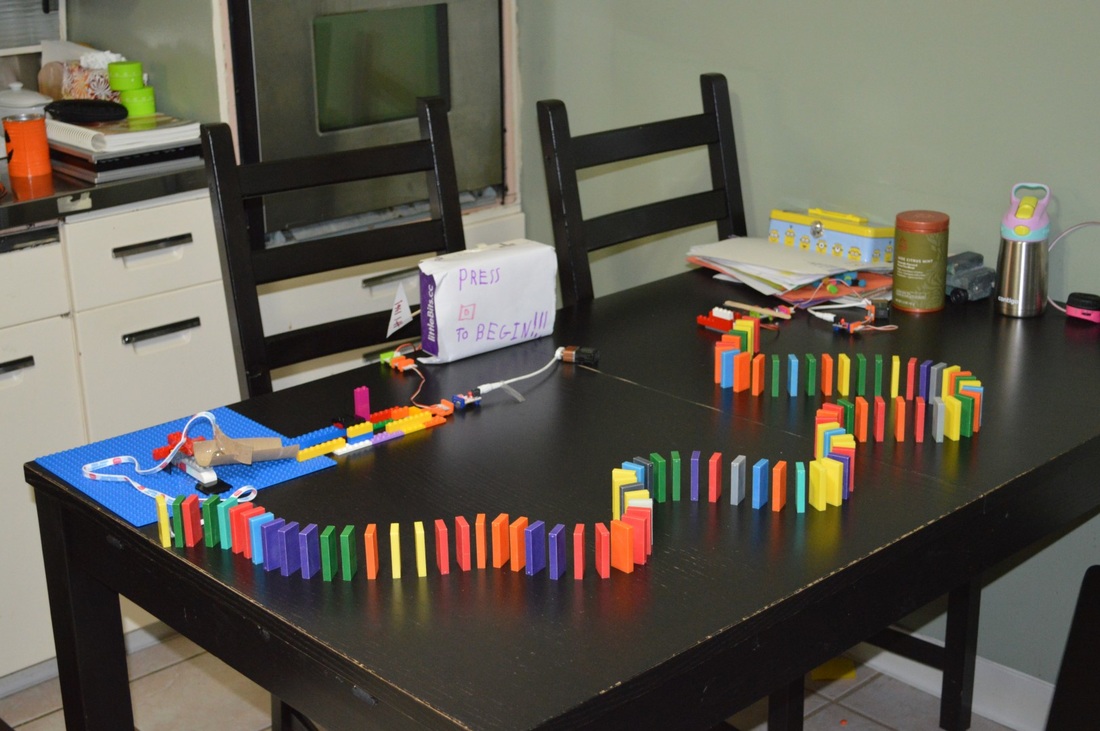
 Welcome to the first in our series of Chain Reaction (Rube Goldberg) Machines. We wanted to start off simple with only a three step machine. We used a sound trigger to kick off a servo motor with a stick on it to start the dominoes (Step 1). The last domino had a shoe string attached to it and fell off the table, which pulled a stopper holding back a marble (Step 2). Then the marble rolled down a ramp to force a wire to connect to a power bit, which powered another servo motor attached to the ending flag (Step 3). The ramp is a toilet paper roll cut in half. We cut 2 small slits in the roll to wedge another small piece of TP roll into for the stopper. Click the pictures below for detailed pictures of each step.
6 Comments
Post by Jack Today's builds are two machines for my Jump Rope for Heart Campaign. Every year my school does a fund raiser to raise money to help people with bad hearts. If you would like to donate to my campaign, please click this link: Jack's Jump Rope for Heart Kaylee and I each did a build with help from our dad. Kaylee's is a jump rope with a static heart. Mine has a jump rope and a jumping heart. Kaylee's Machine
This build was pretty simple. We used a pipe cleaner for the jump rope as the DC motor doesn't spin fast enough to use a piece of string. Jack's Machine
Little Bits:
This build was tricky. We wanted to have a heart jumping, but we had to figure out some way for it to be inside the rope, otherwise the rope would catch on wires powering the jumping heart. We figured out we could build a "jumper" that would dangle from the axle powering the jump rope. The jump rope itself was pretty easy, just two tall towers to hold the axle, and a couple of gears to attach the pipe cleaners to then hook up the DC motor and off it goes. The jumper was a real pain in the butt though. It uses a lego adapter, battery bit, an LED (needed for length), and a servo. We had to build a little shelf on the jumper to hold the battery. It took a LONG time to get the jumper just right. It was a lot of trial and error, the thing would fall apart constantly. We tried at least 4 or 5 designs before finally settling on this one. Key Lessons Learned from this build:
Our goal with this build was to use little bits to make a lego robot's arm move. The build is very simple, but it was fun actually making Legos move. More Information Coming Later...
Post by Kaylee I got two Lego sets for Christmas. I got a doggie house with a little doggie and those little bones. I built it by myself! I also got a girl in a car with a surfboard, another little brown doggie, and ICE CREAM!
This was our first real build of something powered by little bits.
Materials Used:
The build took roughly 45 minutes. Building the structure was relatively simple. The motorized part was tricky and took a lot of trial and error. Key Lessons Learned from this build: 1) We should have made sure the post (the big cardboard tube) was more stable before adding the motorization. It kept tilting and we had to keep adjusting it. 2) We learned how to have the motor separate from the turning gear by using rubber bands and wheels instead of having the motor inline with the gear. 3) Having a large bag of various sized rubber bands was critical, as we needed to find the right thickness and tension between the wheels. 4) We used rubber bands to keep the motor attached to the lego bit. Then we had to use larger lego bricks for more connection points to stop the motor from popping off. |
AuthorWrite something about yourself. No need to be fancy, just an overview. Archives
March 2017
Categories
All
|


 RSS Feed
